IS YOUR FAMILY PREPARED? Emergencies ~ Financial Hardship ~ Natural Disaster ... Learn everything you need to know about emergency preparedness to ensure the well-being of your family, come what may. Custom 72-hour kits ~ THRIVE Food storage ~ Food rotation shelves ~ Water storage
Who knew emergency preparedness could be this fashionable!
Shelf Reliance is the premier source for food storage, emergency preparedness, and food rotation systems.
Earn a great income while working from home! Become one of the first Shelf Reliance Consultants! Call Berit at 505-385-3942 to find out about becoming a Consultant in your area.
Contact a consultant to receive the lowest special party pricing, even lower than our online sale prices!
Want to hold a Tasting Demo at your house and earn free products and other discounts all while helping your family and friends become prepared?
Party guests will receive discounts on all Shelf Reliance products, including the revolutionary Home Store Program, The Q.
If you live in any of these states, you would be one of the first Shelf Reliance Consultants in your state!! But remember, there is plenty of room for growth in every city and state across the country, no matter where you live!
Alabama
Maryland
Delaware
Nebraska
Hawaii
New Hampshire
Iowa
New York
Kentucky
Okahoma
Louisiana
Rhode Island
Maine
South Dakota
Vermont
All Shelf Reliance Consultants are required to start out with a mentor. We can help you become either the very first one in your area, or help you develop your own business and team regardless of where you live!
To find out more info about how you can become a consultant in your area, E-Mail:
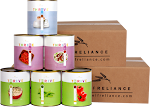
Shelf Reliance now offers a freeze-dried cheese line including Cheddar, Colby, Monterey Jack, Mozzarella, and a cheese blend! In addition to this, we now offer all of our freeze-dried meats in pantry cans! Please go to the website to see more details in the product section. (Be sure to contact a consultant such as myself to receive the lowest party pricing...the website pricing is higher than the party pricing.)
Shelf Reliance THRIVE Freeze Dried, I will help you plan a "stockpile" for you and your family! THRIVE Food cans are sure to liven up your pantry with lots of color and delicious variety! My favorites include mango, pineapple chunks, banana slices, sausage, butter, raspberries, blueberries, & blackberries. The celery, onion and chicken are a favorite in chicken salad. All the freeze dried foods have an extended shelf life of 25-35 years and 1 to 2 years after opened! The eggs go great in quiche or any baking and are cheaper per egg than the grocery store! I can send you a free sample of anything you'd like to try, just send me an email with your address :)
Food Storage is an important part of emergency preparedness, and we want every individual and family to have the peace of mind that comes with building a long-term supply. However, we also understand the needs and budgets of every person vary. Food storage can be costly and time-consuming -- until now! Enter the THRIVE™ Q.
With the THRIVE™ Q, you build a customized food storage plan that we divide into monthly shipments. If you are unsure of where to start, simply use the THRIVE™ Planner, our food storage calculator, to determine how much you need. You can also add specific items to your THRIVE™ Q if you already know what you want.
Begin working on your THRIVE™ Q by setting a monthly budget. Your budget can be altered to accommodate changing circumstances, and you can even skip shipments in months when money is tight. With the THRIVE™ Q, you can build your supply without feeling the burden of debt. It can be as low as $50 a MONTH!
Each month, on the day you choose, the Q will create a new shipment that includes food from your list. The Q is designed to work automatically; monthly shipments will be generated from your list by our program. The THRIVE™ Q requires no customer maintenance once it is activated with your payment information. Of course, you always have the option edit your plan or add new items as you see fit.
The THRIVE™ Q is meant to give you more freedom and control over your food storage. There's no need to buy all of your food at once or keep track of what you need with endless lists and spreadsheets. Rather, you're able to receive everything you want at a gradual pace, using a monthly price that fits your budget and life. We also ensure that you will always get the lowest sale price on your THRIVE™ items.
Food storage doesn't get any easier than this. What are you waiting for? Try the THRIVE™ Q today!
Planning how much food storage you need for your family is a daunting task. Shelf Reliance is here to take the stress out of getting your food storage supply and customizing it to fit your family. Whether you're starting from scratch or already have some existing food storage, we'll help you get everything you need.
Since you eat what you store, we also want to help you maintain your food storage. You can modify your saved plan at any time. Keep track of the food that leaves your pantry, and we'll make it easy to replenish. Click HERE to start a free custom plan for your family!
FAST FACTS
store at least 1,200 calories per person per day for the first 72 hours of an emergency
store a year's supply of food for sustained emergencies, food shortages or quarantines
SHORT TERM FOOD STORAGE
include easy to prepare, easy to carry food that you could take with you should you need to evacuate. MRE's, freeze dried foods in pouches or food bars are ideal)
LONG TERM FOOD STORAGE
Store in a cool, dry place to prolong shelf-life
If not feasible to purchase a year's supply, start with a one month supply and add to it as often as you can until you have built up a year's supply.
Think of your long term food storage as an insurance policy. It can be critical in an emergency and for the months following while the economy and your life regain normalcy. It can also help sustain you during individual times of need
Nothing can replace the peace of mind you feel knowing you can provide for yourself and your family in any situation
Thursday, May 6, 2010, 11:15 am, by cmartenson
On Tuesday afternoon (5/4/2010), while I was engaged in my weekly biology class with a group of homeschoolers, the wind suddenly kicked up out of nowhere with a single strong gust. Looking out the window, all eight of us were struck by what looked like a yellow cloud lifting up over the nearest ridge about a mile away.
It wasn't a yellow cloud; it was soil, lifted violently from the fields in the valley below, its color highlighted by the dark clouds above. Suddenly, the tree tops on the ridge to our west all bent over in unison, as if brushed by a giant invisible hand. There was a pause, and then we got hit with a blast of gritty air, probably in the vicinity of 50 mph, that toppled trees in our yard and turned out the lights. Boom. Just like that. We had about 2 minutes to react and prepare, from start to finish. The Tree That Ate My Electricity
We got hit by a squall line, which would have been a "white squall" if we'd been on the water; the kind of storm that routinely flips sailboats because it catches them in an awkward position with too much canvas on the mast.
And it wasn't just us; towns up and down the CT river got hit just as bad or even worse, and power crews had to contend with thousands of outages, including at the area hospital. By Wednesday morning, it was pretty clear that we weren't going to be getting our power back for a while. Reports were drifting in of widespread damage and serious outages, and rumors surfaced that it might be a couple of days until we got our power back. Information was sketchy and hard to come by.
At first I was thinking, "No big deal; we're pretty well covered." But I soon discovered that we had some pretty big holes in our preparations and thereby learned a number of important lessons.
To my great chagrin, I discovered that the propane tank that feeds our gas stove was only 1% full, and we soon depleted it. Oops. It's my job to keep track of it and call the propane company when it gets to 30%, and I'd somehow let that slip by. And just to really rub it in, our outdoor grill was also nearly out of gas, making cooking and heating water more of a chore than it needed to be.
Worse, we hadn't yet gotten around to having any rain barrels set up, so we were very soon scrambling to obtain water to use to flush toilets and wash dishes. Luckily, we have plenty of water containers. Unfortunately none of them were full at the time, so off we trundled to places where we could get water.
Our flashlights operate on rechargeable batteries, and only a few were sufficiently charged. So we turned to hurricane lanterns (the kind with wicks that burn oil), which were great to have and reminded all of us of our summers in Maine, where these devices supply most of our lighting needs. But it would have been nice to have at least one flashlight per family member (plus one for the guest staying with us at the time).
Of course, I lost contact with the Internet and this site, as my computers and Internet access are all tied to the power grid. Fortunately, I have a backup plan for accessing the Internet and maintaining contact with this site, but in this case it did not work very well. In the past, such as when on vacation or traveling, I've maintained contact by using my Blackberry as an antenna and tethering it to my laptop. While all of that worked, and I had electricity from the solar array to run everything, the problem was that my cell reception was degraded to the point that I could not manage to post comments. I could read everything fine, but I couldn't post anything.
I think the explanation for this is that the cell towers were overloaded with other people who were relying on their cell phones, and so mine could not operate above the critical threshold required to handle posting. So as a result, I am now developing back-up plans for my back-up plans.
The good news was that our solar PV system did its job perfectly, and also supplied our freezer with electricity, preventing a pretty expensive melt-down that would have cost us hundreds of dollars.
Finally, at 11:00 last night, our power was returned, 30 hours after it had gone off. Water once again came out of the taps like magic, the refrigerator busily hummed away, and all our electronics beeped back to life.
Lessons Learned
Keep things topped off. I thought I had already learned this lesson some years back. Apparently such lessons wear off. This week I will be installing rain barrels (or even buckets), filling all the propane tanks, and making sure all my batteries are charged and ready. Sometimes things happen with almost no warning. Somewhere in the back of my mind, I always assumed that I'd have warning for nearly any event. Weather usually comes with a fair bit of warning. This event did not. Okay. Lesson learned. And I don't mean just about weather related phenomenon. Perhaps there's a "white squall" lurking out there in the economic sphere as well. The essentials. Being without refrigeration and water is just not fun, so I am going to focus on getting the rest of our solar panels installed and hooked to a larger battery array as a next matter of business. With our solar hot water going in, we'll be living large in almost any situation as long as we can run our well pump. Solving the energy pig that is our refrigerator is a different matter, and I am still not sure how to handle that one, but we'll work something out. Without electricity, life changes radically. I know this, but knowing and experiencing are two different things. One thing I had not purposely done in the past was to cut off our power for a period of time to see how we'd do. That's the only way to really know. Now I plan to apply these learned lessons and then cut our power for a longer duration just to find out where the kinks are.
Conclusion
I am thankful for this mini dress-rehearsal that nature delivered to our doorstep. By having our power cut off for more than a day, many weaknesses were exposed. We got to know a few neighbors a little better. All in all, it was a very good thing.
Being cut off from this site was a challenge, especially since so many enormously important market events are happening right now. It's extremely important to me that I be able to remain connected with this community during such exciting times.
For anyone wondering where I went during these past few exciting days, I was reduced to lurker status, but now I'm back.
Myth #10: The Government Will Give Me Food in an Emergency.
Even the government tells you to have at least a three day supply of food on hand. It may take that long or longer before they get to you, if they come with food at all. It’s best to be self reliant.
Myth #9: I’ll Never Be in a Disaster Where I Need Food Storage.
Oh? What if it’s not a natural disaster that puts you in a bind? If you’re injured or have lost your job, use stored food and pay bills with what you would have spent on food.
Myth #8: Food Storage Tastes Disgusting.
Have you tried it lately? It’s much better these days with so many more delicious choices.
Myth #7: Food Storage is a Pain to Rotate.
Not to worry. The way long term storage food is packaged these days, it can last 30 years.
Myth #6: To Live Off Food Storage I Have to Do Things Like Grind Wheat and Bake My Own Bread.
Make all the bread you want, or don’t make any at all. Freeze dried food preparation only requires hot water and waiting a few minutes.
Myth #5: Only Fanatics and Doomsdayers Get Food Storage.
You might be surprised how many “normal” people are being prudent and getting storage food. Didn’t your grandparents or great grandparents have a root cellar full of preserved food?
Myth #4: I Don’t Have Room For Food Storage.
Everybody has nooks and crannies they could use for at least a couple weeks worth of food. How about under your bed? Get creative.
Myth #3: You’re Better Off Saving Money than Stockpiling Food Storage.
What if you can’t get to your money in an emergency because banks are closed, power’s out, etc.? If you’d use money in an emergency to buy food, why not spend it for storage food now so you won’t have to buy food in a time of crisis?
Myth #2: I Can Just Use the Food in My Fridge or Cupboards For Food Storage.
If power’s out for long, there goes whatever’s in your fridge or freezer. Will you be able to cook what’s in your cupboard without electricity?
Myth #1: Food Storage is Way Too Expensive and I Can’t Afford It.
Considering how long storage food keeps, your overall cost for a year’s supply may cost much less than you think (Shelf Reliance can also help you kick-start your food storage with tons of free stuff and 1/2 price off stuff that you get from all the host party benefits; We also do double-dippings, if you buy stuff at a party and then host a party, your prior purchase goes towards your own host party benefits). Besides, when you prioritize things, do you need a bigger TV set now, or would you be better off with food you can eat in an emergency?
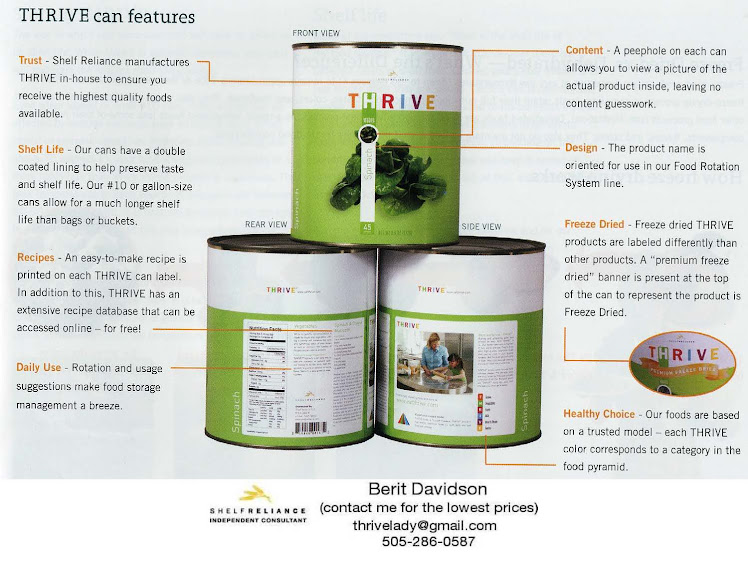
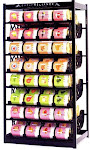
Food storage management has never been easier thanks to Shelf Reliance Food Rotation Systems. Available in sixteen sizes and two depths, our food rotation systems were designed to easily store and rotate a large amount of cans. Every food rotation system features patented front-loading technology and fits easily into most storage spaces. Shelf Reliance Food Rotations Systems are customizable and offer a variety of convenient, versatile food organization options. See all the shelves we offer on our website. Keep in mind, our website shows the retail pricing. Ordering through a consultant can give you access to the lowest party pricing discounts. Contact me at thrivelady@gmail.com when you're ready to place your order.
The Harvest 72" is our
most popular model
Use the Cansolidator for
existing shelving
Not sure what shelving unit will work best for you? Use our FRS Planner to find out!
PACKAGING
All foods are packed in double enameled cans. Each container holds between 40 and 60 servings. Use the plastic lids once the can is opened. Store this way for up to one year. STORAGE
Food for 2 adults takes about as much space as an average refrigerator. (The equivalent of canned foods would take up around 900 cubic feet or half of a normal size basement.) You can easily store your food in a corner of your basement or in a closet. Do not store in a garage or attic. Avoid temperatures in excess of 110° Fahrenheit (43° Celsius), for prolonged periods.
The Open House celebrating the official launch of the Shelf Reliance Home Party program was a tremendous success! Hundreds of people gathered together on Saturday, April 17th at Thanksgiving Point. Guests came from all over the United States including Missouri, New Mexico, California, Arizona, Idaho, and Colorado. Guests enjoyed sampling food made from THRIVE ingredients, mingling with consultants and corporate representatives, learning more about the party program, and also learning about the wide range of products Shelf Reliance has to offer. Many also returned home with a nice door prize. Holly Hardy, Independent Consultant for Shelf Reliance, stated “It was a great event. It was a privilege to be a part of the experience!” At the end of the Open House, guests had a chance to listen to the executives speak about the company and its charity, Thriving Nations, where 5% of all THRIVE profits will be donated to help the hungered. Many consultants were also recognized for their achievements during the soft launch of the company. “The Open House was a perfect event to officially launch the Home Party program nation-wide. This will be a historic event for a company that will soon be known in households throughout the world,” stated Jason Norton, VP of Direct Sales.
Before storing food and supplies, you'll need to select a place that will best meet the criteria for appropriate conditions, relative convenience, and sufficient space. Look around your home and property. Find a room that you can dedicate as your home food store, or in which you can make space for your store.
Finding the Best Conditions for Food Storage
Store your food in a cool, dry place away from sunlight that stays a constant temperature, between 40 and 60 degrees F. this is important because hot or cold fluctuations in temperature can destroy the nutritive value of the food and shorten its shelf life.
Find the coolest place in your house. This will usually be in your basement ( if you have one), but preferably away from a furnace room or other heat source. Freezer, refrigerators, furnaces, and water heaters should not be located in this room because they all give off heat, increasing the room temperature.
Other good locations are root cellars, insulated and heated garages ( where the temperature stays constant between 40 and 60 degrees F), spare bedrooms, unfinished rooms, crawl spaces, closets, under stairways, or under beds. North walls are cooler because they are away from sun exposure.
The room you chose should stay dry at all times. If your clothes dryer is located in this room, be sure it is properly ventilated to prevent moisture from gathering on the food.
Choosing Your Most Convenient Space
Remember: The closer you can locate your food storage area to your kitchen, the easier you will find it to rotate the food storage. The following are some locations you might want to consider in your home food store.
The Basement
If you are lucky enough to have a basement, you will find that the temperature is usually cooler, ideal for storing food. Keep all food away from dryer vents or furnaces, which give off moisture that can rust your cans.
Under the stairways
There is usually a lot of wasted space under a stairway since the sloped ceiling makes it inappropriate for a living area. Shelves can be built that will hold your food storage such as canned goods, large buckets, as well as camping equipment, 72-hour kits, medical supplies, and so on. Hint: Try installing hooks from the ceiling to hold your 72-hour backpacks.
Closets
A pantry can be made out of a closet. You'll be amazed at how much a closet will hold when the shelving is installed properly. Be sure to measure all your boxes or cans so you can make the shelving just the right size to hold your food storage items without leaving any more wasted space than necessary. I like to build the first shelf high enough off the floor (or ground) so several six gallon buckets can be stored underneath. I keep all my bulk food such as rice, beans, sugar, flour, wheat, pasta, and dried potatoes in buckets so I can easily slide them out, take what I need, and use it.
The Garage
If the temperature in your garage fluctuates between freezing in the winter and hot in the summer, then your garage isn't the best place for food storage. Food retains it nutritive value approximately 50 percent longer when it stays at a relatively constant temperature than when stored in extremely uneven temperatures.
However, a garage is a great place for all other short-term emergency equipment and kits, as well as nonfood items such as extra toilet paper and paper towels. If your garage temperature goes below 32 degrees F in the winter, you can store grain and beans there because the freezing temperatures will kill bugs.
The Attic
Do not store food in your attic if it heats up in the summer (most attics do). The food will spoil quickly in hot temperatures. If your attic is vented and insulated and stays a fairly constant temperature, it will be just fine. Remember, however, that the farther away from the kitchen the food is stored, the harder it will be for you to get to and rotate. If your attic is fairly close to your kitchen and easily accessible by stairs or a pull-down ladder, it may work just fine for you.
The Utility Room
If large enough, your utility room may well double as a room for food storage. Shelves can be built above the washer and dryer to store extra laundry soap, bleach, and other cleaners. I had two feet of wasted space along one wall in my utility room, so I had shelves built along the entire wall. The top shelf holds all my canning and sprouting equipment, wheat grinder, juicer and large roasting pans, along with extra blankets, pillows, sleeping bags, and more.
The side shelves were built to hold all my spices, which I buy in bulk and store in plastic containers, as well as my gallon-sized containers of food. The center has two rolling self-feeding units that hold twenty cases of canned goods. They can be pulled in and out to stock the shelves from the back. I love my utility room now; it is very organized and holds a lot of food and food-preparation equipment. In addition, it's close to my kitchen, which makes it convenient for me to rotate and use foods stored there.
The Kitchen
My kitchen cupboards are full of clear plastic containers, such as those made by Rubbermaid or Tupperware. I put the food that I use often in these containers. The contents of a gallon-size (#10) can will fit just right into these plastic containers and the containers fit nicely on our kitchen shelves. Although they're clear and we generally can see what's in them at a glance, I still label the fronts so I know exactly what's in each container and date it so I know precisely when it was opened. It is best to use darker containers, which block more light than clear or neutral-colored containers. You can purchase dark plastic containers for bulk food storage items and spices through some of the food storage supply companies listed in the Resource Guide.
Ideas for Tight Quarters and Apartment Dwellers
If you live in a small house where space is very limited, that doesn't mean you can't prepare for at least short-term emergencies by storing extra food and supplies. Because you will probably want to disguise your stockpile the best you can, I've included some suggestions that will make your stash practically invisible- and sometimes even practical or decorative! You can use your own imagination to come up with clever disguises. Here are a few ideas for food storage when extra space is scarce.
Under the Bed
Because the space under most beds is usually empty, it can be a good place to store cases of food storage, which hold six #10-size cans. Case goods from the grocery store, such as green beans and corn, fit nicely under beds also.
You can either just slide the cases under the bed frame or put the mattress right in top of the boxes. Because cases of cans stack nicely, you could create a large stockpile of canned goods under a single mattress. To disguise, simply cover the boxes with a dust ruffle. Be sure to label each box with what is in it, and keep a master list of what you have and where it is stored. Only store the items that you won't be using in the near future, as the more out of the way the storage space is, the harder it will be to get to.
In Bookcases
You can also use #10 cans to make bookshelves or shelves to store more cans of food. Put a board across four cans (two at each end) and stack more cans on top of the boards. ( If the board is long enough to sag under the weight of additional cans, add another #10 can or two in the middle for additional support). Keep doing this until you feel your shelf is tall enough yet still stable.
As End Tables and Coffee Tables
A five - or six bucket can become an attractive end table. Place a round piece of wood on top of the can, cover it with a tablecloth or piece of fabric, and you have created a piece of furniture!
You can also place food storage items inside a trunk or antique chest that you can then use as a coffee table.
2) What and How Much Food Storage you should have?
How to Store Bulk Food Storage items - Storage Containers
Select only the best food grade containers that will exclude light oxygen and moisture. This will greatly extend the shelf life of your food.
5 or 6 Gallon Plastic Buckets or Pails
These buckets have tight fitting lids with rubber gaskets. They are ideal for large quantities of grains, beans, legumes, sugar, flour, etc. you can purchase an inner liner that is made from metalized foil. This liner will keep the light from harming the food and causing it to deteriorate. It also acts as a moisture barrier and keeps rodents out. The bucket with the metalized liner is a very good method of storing food. To seal the Mylar liner, line the bucket with the bag and fumigate with either the dry ice method or nitrogen flushing or oxygen absorber packets. Then get out as much air as possible. Lay the bag flat and use an iron to heat seal the end of the bag, this way you can use the bag over and over again. Pierce a hole in the corner of the bag, hold the bag below the seal so you don't suck up the contents of the bag. Suck all the air out with the hose or a smaller attachment to the vacuum that can be inserted into the end. When the air is sucked out and the bag looks vacuum packed, hold the end and seal it with an iron. Do not let air back into the bag.
Note: Never use buckets that have contained chemicals, paint, sheet rock mud, etc. Restaurant food grade containers are ok, wash them well and rinse with bleach and water.
#10 Size Double Enamel
The #10 size cans hold approximately 1 gallon and are ideal for smaller quantities of food. You can purchase plastic lids to put on the cans after they are opened. Most food storage companies use these types of containers. They are nitrogen packed with an oxygen absorber packet sealed inside the can. These packets absorb free oxygen from the air around them and chemically bind it. This removes the oxygen from inside the can, which helps prevent insects from hatching or even living. This also prevents rancidity from occurring. The atmosphere inside the can is mostly nitrogen, which is ideal for long term food storage. If the oxygen level is below 2%, the food will stay good for a lot longer. If you have access to a cannery you may choose to can your own food.
Mylar Bags
The ones previously mentioned can be purchased from only food storage companies. The heaviest Mylar bags in the large size are the best for lining the buckets. The bag can be sealed with a hot iron. Oxygen packets can be inserted before sealing. These bags are good gas barriers and will not allow the nitrogen or CO2 to escape through the porous walls of the plastic.
Oxygen Absorber Packets
They look like a tea bag or sugar packet. This method is a relatively new procedure and is proving to be one of the best methods. They must be used up with in fifteen minutes of being opened and exposed to the air. These packets absorb the oxygen from the container and trap it in the iron powder, salt and moisture mixture. This is the safest way to remove oxygen these can also be purchased from food storage companies.
The Dry Ice Method
Place about three inches of food on the bottom of the Mylar bag that is inside a plastic bucket. Then place a three-inch square of dry ice on top of the food. Fill the bucket about half full and allow thirty minutes to two hours for the ice to dissipate. Lay the lid on loosely so the gas can escape. Then seal the bucket tightly. One pound of dry ice is used for a thirty-gallon drum of wheat. If the container bulges, take the lid off and let the gas out. Then seal it again.
CO2 and Nitrogen Flush Method
A welding shop will rent you a CO2 tank and nitrogen gas. This can be used instead of the dry ice method. Just flush the food with the gas making sure to get the hose down into the bottom of the container after the food has been put in. sometimes especially with flour, it can spray all over, be careful.
Bay Leaves Method
Bay leaves can be spread throughout the container. Two bay leaves for small amounts up to one gallon or five leaves in buckets. Some people say this works well for them.
Freezing Grain Method
If your buckets of grain are places in the garage for winter, the freezing temperatures will probably kill any weevil that is present. You can also deep freeze grain in ten-pound bags and leave it for a week to kill the bugs.
Diatomaceous Earth Method
Diatomaceous Earth can be mixed into your stored grains and beans to control insects without to remove the dust before consuming it.For every forty pounds of grain or bean, you mix one cup of diatomaceous earth with it. Coat every kernel and mix it in small batches. Cover your mouth so you don't breath the dust in, it can irritate your lungs. The diatomaceous earth you want to use is sold as an organic garden insecticide. There are several different types of DE. Make sure you get the kind that is approvedfor human consumption, and not the swimming pool type.
Hint: Two liter pop bottles can be used to store grain, rice, beans, etc. for short-term usage. They stack on the shelves and you can see what is in them. Other plastic containers work: Ketchup, Gatorade bottle work.
4) How Long Will Food Storage Last?
Shelf Life
Even when you do everything to ensure that your food is protected from the elements and insects, food storage will eventually lose its freshness if left on the shelf too long. Therefore, it's important that you first understand the concept of shelf life. Foods are considered to have a life time during which they remain suitable for use, and after which they are not recommended for human consumption.
When food is stored too long, two things happen: the nutritional value breaks down, and the color, flavor, texture, and smell change to the point that most people will not want to eat it.
Do not allow food storage to surpass its shelf life so you must throw it away. Rotate your food and use it within the estimated period of time determined by research done on each product. For example, dehydrated dairy products and eggs will store approximately seven to ten years; freeze dried foods will store approximately 25 to 35 years; dehydrated fruits and vegetables will store ten years; and grains, beans, and legumes will store ten years or more. Wheat can store up to twenty years or longer. Commercially canned foods should be rotated within two years. However, these rules apply only when foods have been properly canned and sealed with low oxygen content, and are stored at the ideal temperature.
5) Rotation and Deterioration of Food Storage
Causes of Deterioration and Spoilage
In addition to its limited shelf life, food is susceptible to deterioration and spoilage that results from a variety of natural causes. The following are a few of the most common problems that result in food expiration before its estimated shelf life.
Oxygen
Oxygen will rob food of its nutritive value. All living food contains enzymes that, when exposed to oxygen, start to break down the food by a process known as oxidation. Nutritive value is lost little by little as food breaks down. That is why it is important to remove the oxygen from the containers before you seal them. It's also good to store grains a whole rather than cracked grain. Once the kernel is ground, it starts to lose it nutritive value and the rancidity process begins.
Bacteria
Bacteria, yeast, and molds are controlled by several methods: processing, canning, dehydrating, drying, or freezing. Bacteria is the most common cause of spoilage, so it is important to make sure all food is properly processed, by whichever method you choose. Once containers of processed beans, meat, vegetable, and other foods are opened and cooked, you must quickly use up the food to prevent spoilage. For example, wet-packed beans that have retained their food value in a vacuum-sealed can for two years will spoil within a matter of days once the can has been opened. Always refrigerate wet-packed foods ( those packed in water, juice, or other liquid) once they have been opened.
Insects
Insects grow in food because the eggs or larvae are either already in the product before it is packaged or able to get inside improperly sealed packages.
The most common insects found in foods are ants, roaches, earwigs, moths, silver fish, beetles, and weevils. They not only get into the food, but they eat it, deposit their waste products in it, and lay eggs in it. The eggs then hatch and result in infestation.
Light
As you collect containers for your bulk food storage, try to get ones that are dark and cannot be permeated be light. The two containers that most commonly allow light are glass jars ( or bottles) and plastic buckets. If you use glass or light-colored plastic containers, you should store them in heavy cardboard boxes or in a dark room.
Temperature
A cool dark place is a must for food storage. The temperature of the room should stay relatively constant throughout the year. The ideal temperature is between 40 and 60 degrees F, which is the range of most basements.If the temperature is higher than 60 degrees, it will slightly cut down the shelf life of your food storage. If you store your food in a garage, shed, or attic where the temperature fluctuates from very hot to very cold, you could be cutting down the shelf life of your food to half the time listed on the shelf-life chart.
Humidity and Moisture
Humidity and moisture promote the deterioration of most foods. Which is the principle behind dehydrating foods. Because the moisture level of dehydrated foods should remain under 10 percent, they store best when the moisture is removed from the air do they won�t prematurely rehydrate and spoil. Dehydrated food will be hard, but should not be leathery.
Be sure to keep all containers up off the floor and away from anything that tends to raise the humidity level, such as dryer vents, water heaters, or anything that could flood ( such as a clothes washer, dishwasher, sink or shower) and damage the food.
Prevention of Deterioration and Spoilage
Besides avoiding the elements that result in food deterioration, you can take additional steps that will further retard spoilage. You can use any of several methods, depending on what food you are storing, what containers you are using, and what food storage problems you are most likely to face.
Oxygen Absorber Packets
Oxygen absorber packets look like tea bags or sugar packets. This relatively new procedure for retarding spoilage is proving to be one of the best methods. These packets absorb the oxygen from the container and trap it in the iron powder and salt mixture. This is the safest way to remove oxygen. After inserting the oxygen packet into your container, seal the container properly.
Note: Oxygen absorber packets must be used up with in the fifteen minutes of being opened and exposed to the air. If you have several packets left after opening a bag of them, put them in a glass jar with a tight-fitting lid as soon as possible to keep them from absorbing the oxygen form the air . These packets can be purchased from any food storage companies.
Dry Ice Method
Another effective method of removing oxygen from food containers is to place a Mylar bag inside a plastic bucket. Add about 3 inches of food inside the mylar bag then place a 3-inch square of dry ice on the top of the food. Fill the bucket about half full and add another piece of dry ice. Fill the bucket full and allow thirty minutes to two hours for the ice to dissipate, forcing the oxygen out as it does so. Lay the lid loosely so the gas produced by the dry ice can escape. Then seal the bucket tightly. One pound of dry ice is used for a 30-gallon drum of wheat, and one-sixth of a pound of dry ice is used for s 5-gallon bucket of wheat or grain. If the container bulges, take the lid off to let the gas out. Then seal the container again.
CO2 or Nitrogen Flush Method
A method that you might use instead of the dry ice method is the CO2 method (also called nitrogen flush). A welding shop will rent you a CO2 tank and nitrogen gas. Just flush the food with the gas, making sure you get the hose down into the bottom of the container after the food has been put in it. Sometimes, especially when you're sealing containers of flour, the food can spray all over, so be careful.
Again, the nitrogen pack method and oxygen absorbers will remove the oxygen and prevent insects from living. Because they can't breathe without oxygen, the larvae die before they even hatch.
Bay Leaves Method
Placing bay leaves into your grain and spreading them throughout the container is another popular method of discouraging bug infestation. Because bugs don't like the smell of bay leaves, they are deterred from getting into the food. Two bay leaves per gallon or ten leaves spread throughout a 5-gallon bucket are enough to effectively do the job. Bay leaves laid inside food storage cupboards will discourage bug infestation there as well.
Freezing Grain Method
If you live in an area where winter temperatures drop below freezing, you can probably kill any weevil that is present by placing your buckets of grain in an unheated garage or other storage area for the winter. You can also deep-freeze grain in 10-pound bags and leave it in you freezer for a week to kill any bugs. After you take the grain out of the freezer, if any moisture appears to have gotten into it, let the grain dry then seal it in the proper containers.
Diatomaceous Earth Method
You can also mix diatomaceous earth into your stored grains and beans to control insects without having to remove the dust before you consume the food. The diatomaceous earth you want to use is sold as an organic garden insecticide and is not harmful when ingested. Warning: There are several types of diatomaceous earth. Make sure that you get the kind that is approved for human consumption rather than the swimming pool type, which contains harmful chemicals.
For every 40 pounds of grain or beans, mix one cup of diatomaceous earth with it. Mix it in small batches to be sure it coats every kernel. Cover your mouth and nose so you don't breathe the fine dust because it can irritate your lungs.
Using the Right Food Storage Containers
The very best way to protect your stored food is to start with the right food storage containers. They must be food-grade containers that will exclude light, oxygen, and moisture. Such containers will also protect your food from infestation of insects such as weevils and black sugar beetles.
6) How to use Food Storage
How do I use the food?
There are more recipes than you can imagine on the Shelf Reliance website, specifically made for THRIVE foods. If you haven't yet tasted the high quality, contact a consultant (thrivelady@gmail.com) to taste some foods. I am confident you and your family will love it!
We’re not saying stop shopping at your local grocery store, we’re saying to reallocate some of that grocery budget from the ordinary canned food to these great, nutritional THRIVE foods, and incorporate them into your everyday cooking.”
If you are like me, you sometimes throw away meat, fruits, vegetables and grain products.
You can’t go wrong with a SR Food Rotation System, especially at party pricing! They’re easy to use, fully adjustable to any can size, very durable, and keep your food properly rotated so it doesn’t go bad. They work for both THRIVE cans and ordinary cans.
7) The 7 Mistakes with Food Storage
Improper Storage Containers - See "How to Store Food Storage" above
Improper Storage Location - See "Where to Store Food Storage" above
No Variety, No Balance - Add THRIVE foods to your storage
Lack of Water Storage or Filtering System - Always store enough water for a 2 weeks supply and a water filtering system for longer term needs. Many food storage items are freeze dried or dehydrated and require water to reconstitute them.
Rotate and Use Your Food Storage - Make it part of your life. Store the foods you eat, eat the foods you store. If you eat 1 meal from your storage once a week you will rotate your 1 year supply every 7 years.
Add Vitamins and other supplements for your personal needs.
Have the necessary preparation and cooking equipment (wheat grinder, etc...) and have a reserve of fuel or optional way to cook your food.
Greatest food storage system since Joseph in Egypt!
You're Invited! THRIVE Shelf Reliance Party Invite
BlogCatalog
Click on card to visit my Shelf Reliance Home Store!
June price-list & order form
If you would like to order , click HERE to see our Fall Pricelist. Note the Q-club pricing discounts. I can help you set up a Shelf Reliance Q and show you how to become a Q-Club platinum member for free so you can receive these discounts for life and collect points towards free product. I can also help you receive host benefits to kick start your home store!
Shelf Reliance Canada!
Click on the picture to visit Shelf Reliance Canada
Berit grew up in Vancouver BC and moved to Idaho in 1990 to attend Ricks College, currently BYU Idaho. She then transferred to Simon Fraser University in British Columbia to continue working on her Bachelor of Arts, and shortly afterwards, was hired by the Vancouver Public Library where she enjoyed working closely with disabled and homebound people in the Outreach Services Department. In 1996, while still working for Outreach, she began working towards finishing her Royal Conservatory of Piano, studying Music Theory, Composition and History. Alongside this, she enjoyed some part-time work playing for the Hudson Bay Department Store in Vancouver, as well as the Westin Grand Hotel and the Westin Bayshore Resort.
In 2004, Berit married her now belated husband, Robert, and moved to Philadelphia PA to join him. Her beloved husband suddenly passed away early in 2008 of NH lymphoma B. She is grateful for the precious years they had together.
A year later, Berit met her current husband, Daren Davidson, who has been a wonderful companion to her since.
http://davidson.shelfreliance.com/davidson/story
25+ year shelf life ♦ lowest prices ♦ highest quality
Click on Price-List to view our product line
Contact thrivelady@gmail.com or call 505-385-3942 to find out about our amazing host benefits!
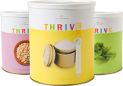
Click on THRIVE image to see products at a glance
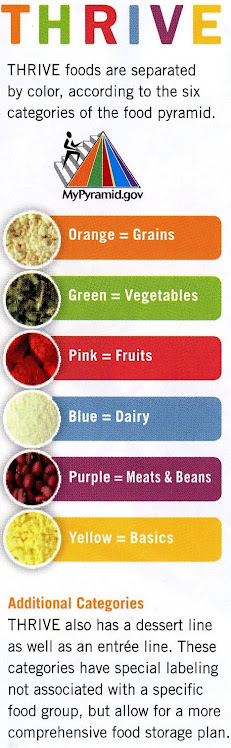
• THRIVE is unique because we offer a vast line of quality products (2nd to none!) with a 25+ year shelf lifethat are easy to use on a daily basis
• many THRIVE Foods are naturally free from common food allergens
• THRIVE foods are GMO free & contain no additives or preservatives • THRIVE retains almost all the original nutrition
• Shelf Reliance donates 5% of all THRIVE profits to our charity, Thriving Nations, which helps to feed hungered nations & teach them gardening/farming techniques
We have searched the globe for only the freshest, highest quality ingredients. Our foods have been personally selected based on the strictest of standards. From the farm to your home, we personally oversee the entire THRIVE development process so you can have peace of mind knowing you are receiving the finest food storage products available.
Best Taste
Because THRIVE was developed for everyday menu planning, we've made it our mission to ensure the foods you're eating taste great! Unlike other food storage products that get hidden away and never used, our products have been tested time and time again to verify their freshness and great taste. With THRIVE foods, great taste is the standard - not the exception.
Best Value
With a low per serving cost, THRIVE foods are a great way to save money while guaranteeing your family receives the food variety and nutrition they deserve.
Easy Preparation
Easy-to-make recipes are included on every can of THRIVE so you'll never be left wondering how to use the food storage you buy. Because we want your family to enjoy the best taste and nutrition possible, all of our recipes have been developed specifically for THRIVE products.
Easy Organization
Our color coded cans keep your food conveniently organized while ensuring your diet contains the proper amount of balance and variety. When used in conjunction with our Food Rotation Systems, THRIVE foods are continually rotated, guaranteeing your family receives the freshest food possible.
THRIVE Food for Thought!
• Many THRIVE Foods are naturally free from common food allergens. • THRIVE freeze dried foods are GMO free and contain no additives or preservatives • THRIVE retains almost all the original nutrition • THRIVE instant milk is lactose free and tastes identical to real milk • By keeping familiar items on hand, you're better able use your food storage should you have to rely on it in an emergency • Only a consultant can set you up with Party Pricing for Life. You will get a percentage off of everything on their site! So if you look through their site know that that won't be the price you will pay. • Shelf Reliance sells food rotation systems emergency preparedness items, like 72 hour kits, water barrels, etc. The 72'' Harvest Shelf is a favorite for many. The Cansolidators can save you tons of space and help you organize your pantry nicely as well. You can go look at at all their shelves here and their emergency items here. • Shelf Reliance is like having quality ingredients in your pantry that just happen to have an extremely long shelf life • The THRIVE Q is meant to give you more freedom and control over you food storage. There's no need to buy all of your food at once or keep track of what you need with endless lists and spreadsheets. Rather, you're able to receive everything you want at a gradual pace, using a monthly price that fits your budget and life. Food storage doesn't get any easier than this! • How much is enough? That's up to every family. Is it better to have what you don't need or to need what you don't have? • "Long term storage food is a good insurance policy for the family. What sets this apart from the rest is the cost per calorie and cost per nutrition ratios. It can't be matched anywhere by anyone. To top it all off, Thrive quality is second to none so unlike other offerings out there, you aren't sacrificing quality to get quantity. This has it all."
The ease and reliability of Shelf Reliance products have had people talking to their neighbors, family members, and co-workers for years now! Visit our website at davidson.shelfreliance.com. If you see anything there you'd like to try, please email me at thrivelady@gmail.com and I would love to send you a sample pack!
The goal of Shelf Reliance Home Parties is to share the vision of preparedness and food storage with people across the country. There’s a certain sense of accomplishment that comes from building your own future while helping others prepare for theirs, and Shelf Reliance Home Parties is the perfect opportunity to experience this for yourself. Our great-tasting food and low pricing have made us a leader in the industry!
Home Parties In Your Area
For those of you who don’t live nearby, never fear! You can still get involved by using the contact information provided at the end of this post. This is just the beginning, and with the help of people like you, Shelf Reliance Home Parties will be available in your area before you know it. To learn more about this exciting opportunity, or if you have further questions, send an e-mail to thrivelady@gmail.com or call (505)286-0587.
Motto
Shelf Reliance, through superior products and sound education, empowers people to become self reliant, prosperous and charitable.
Vision
♦ Help millions of families be prepared for hardship. ♦ Save lives every day from hunger and thirst. ♦ See Shelf Reliance products in homes all over the world.
Values
Hard Work ~ Honesty ~ Customer Satisfaction ~ Growth ~ Balance ~ Service


.jpg)


